Creating and automating a serverless profile application with AWS SAM, AWS CI/CD & Angular
Introduction
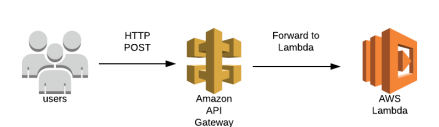
In this blog, i am creating a serverless application with AWS Lambda & API Gateway using SAM. The API will return the personal profile data as JSON which will be consumed by an angular frontend to develop a single page application and host that on S3.
Project source code: profile-serverless, profile-serverless-angular
Intended Audience
- You know AWS Lambda, API Gateway, AWS SAM and now want to know how to develop an end-to-end application.
- You are interested in automating the AWS SAM build & deployment.
- You are interested in developing your personal profile website.
What is AWS SAM?
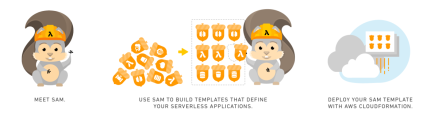
The AWS Serverless Application Model (SAM) is an open-source framework for building serverless applications. It’s a shorthand way to write lambda functions, APIs, databases, and event source mappings. AWS SAM is an extension of CloudFormation. So we can use the full suite of resources, intrinsic functions, and other template features that are available in AWS CloudFormation.
Initializing & setting up the SAM project
Initializing the SAM project is straightforward. We just have to choose the project runtime and it’s name. For this blog, I am using Python and project name is profile-serverless. Create the project workspace. For example, <dir>/profile-serverless/. Change to <dir>/profile-serverless/ and then execute this command:
<dir>/profile-serverless> sam init --runtime python3.8 --name profile-serverlessInitializes a serverless application with an AWS SAM template. The template provides a folder structure for your Lambda functions, and is connected to an event source such as APIs, S3 buckets, or DynamoDB tables. This application includes everything we need to get started and to eventually extend it into a production-scale application. You can open this project in any editor of your choice. I used VS Code.
Create AWS serverless profile project
Configure your profile data
Configure the profile.json based upon your own personal profile. Refer the simple profile below:
{
  "statistics": {
    "Years": "15+",
    "Projects": "20",
    "Certifications": "10+"
  },
  "personal": {
    "name": "Khan, Malik Sikandar",
    "title": "Experienced Software Consultant"
  },
  "technicalSkills": {
    "Programming Languages": [
      "Java",
      "Python",
      "Go"
    ]
  },
  "certifications": [
    {
      "certification": "AWS Certified Developer Associate"
    }
  ],
  "education": [
    {
      "university": "National University of Singapore"
    }
  ],
  "projects": [
    {
      "projectName": "Some Project"
    }
  ]
}
Store this profile.json in <dir>/profile-serverless/profile_loader.
Profile loader Lambda function
Create profileloader.py in <dir>/profile-serverless/profile_loader. This simple python program will basically do two simple things. One, read the profile, second, return it as the response.
import json

with open('profile.json') as f:
  data = json.load(f)

def lambda_handler(event, context):
    return {
        'statusCode': 200,
        'headers': {
          "Access-Control-Allow-Origin": "",
           "Access-Control-Allow-Credentials": "true"
        },
        'body': json.dumps(
          {
            'data': data
          }
        )
    }
You may also want to add requirements.txt in the same directory and include requests & modules.
Profile loader API
Look for template.yaml in project directory. This file is created by AWS SAM init command. It comes with Hello World function & API. We will remove or rename all occurrences of these and replace them with “ProfileLoaderFunction” & “ProfileLoaderApi”. template.yaml will look something like this after that.
Resources:
  ProfileLoaderFunction:
    Type: AWS::Serverless::Function
    Properties:
      FunctionName: ProfileLoaderFunction
      CodeUri: profile_loader
      Handler: profileloader.lambda_handler
      Runtime: python3.7
      Events:
        ProfileLoaderApi:
          Type: Api
          Properties:
            Path: /getProfile
            Method: get
Test Profile loader function & API locally
Build the project
sam build --use-containerTest the profile loader function locally
sam local invoke ProfileLoaderFunction --no-eventTest the profile loader Api locally
profile-serverless$ sam local start-api profile-serverless$ curl http://localhost:3000/Note: You need docker installed locally to test this.
Packaging & Deployment
sam package --template-file template.yaml \
    --output-template-file output-template.yaml
    --s3-bucket <S3_BUCKET>
Mention your S3 bucket name above.
sam deploy --template-file output-template.yaml \
    --stack-name ProfileLoader \
    --capabilities CAPABILITY_IAM
Continue to read if you want to automate this application with AWS CI/CD. Before we proceed, copy the profile-serverless project to GitHub or CodeCommit. I am using GitHub.
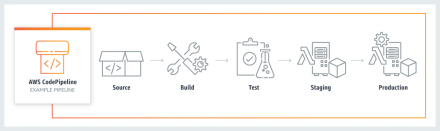
Setup CI/CD for serverless profile application with AWS Pipeline
Create AWS Pipeline
Create a new folder pipeline inside <dir>/profile-serverless and run this command:
<dir>/profile-serverless/pipeline> sam init \
    --location gh:aws-samples/cookiecutter-aws-sam-pipeline
Choose AWS Pipeline project name: profile-serverless-pipeline Choose your GitHub / CodeCommit repository
It will then create a set of necessary artifacts required for this automation. Now move the buildspec.yaml from pipeline folder to the root of the project. It should look like this:
<dir>/profile-serverless/buildspec.yamlConfiguration
AWS Pipeline (actually AWS CodeBuild) needs access to the GitHub repository so that it can build the project. It needs to know the username, repository and the access token. We are going to configure these properties in AWS Systems Manager Parameter Store. For more information, Refer to https://docs.aws.amazon.com/systems-manager/latest/userguide/systems-manager-parameter-store.html
aws ssm put-parameter --name "/service/profile-serverless-pipeline/github/user" \
    --description "Github Username for CF Stack profile-serverless-pipeline" \
    --type "String" --value "<YOUR_USER_NAME>"
aws ssm put-parameter --name "/service/profile-serverless-pipeline/github/repo" \
--description "Github Repository name for CF Stack profile-serverless-pipeline" \
--type "String" --value "profile-serverless"aws ssm put-parameter --name "/service/profile-serverless-pipeline/github/token" \
--description "Github Token for CF Stack profile-serverless-pipeline-pipeline" \
--type "String" --value "<GITHuB_TOKEN>"Refer to https://help.github.com/en/github/authenticating-to-github/creating-a-personal-access-token-for-the-command-line to find out how to get the developer access token.
Create CloudFormation stack
aws cloudformation create-stack --stack-name profile-serverless-pipeline \
    --template-body file://pipeline/pipeline.yaml \
    --capabilities CAPABILITY_NAMED_IAM
pipeline.yaml contains the necessary services and roles required to create the stack. It’s a one time job. This also has a manual approval phase. So, if your build process is taking too long, it’s probably waiting for the approval. In this case, go to Code Pipeline console and approve the step. Plus, you may want to delete the unnecessary environments. You can always refer to the working source code here at GitHub.
Test the Pipeline
Make changes to the profile-serverless project and do git commit & git push. This will trigger the build process. Verify your changes by hitting the API Gateway endpoint.
Continue to read if you want to host your personal profile on S3 bucket with Angular front-end.
Lets configure the project to create our own single-page serverless application to host your personal profile. It’s built with Angular. Code is very basic at the moment. It’s not too optimized and not too flexible. For example, the endpoint is hard-coded. Environments are not configured. No state management. It’s not compiled ahead-of-time. But, it’s good for demonstration purpose.
Setup & Configure the Angular application
Checkout the source code from here. Open the project in editor your choice. I used VS Code.
API Gateway configuration
Configure the API Gateway endpoint in ProfileService.ts file. Get the source code from here.
CORS Configuration
Add these CORS headers in profileloader.py lambda. Refer to the source code here.
'headers': {
    "Access-Control-Allow-Origin": "<<S3 BUCKET URL>>",
    "Access-Control-Allow-Credentials": "true"
}
Add these CORS headers in tamplate.yaml as well. Refer to the source code here.
Api:
  Cors:
    AllowMethods: "'*'"
    AllowHeaders: "'<<YOUR S3 BUCKET URL>>'"
    AllowOrigin: "'*'"
Note: If you see any issue, first try to put “*” in allowed origin to see if it’s working. The try to put correct S3 URL in origin.
Build & Deployment
Build the project by running this command. This will create the build artifacts under dist/ directory.
npm run buildI used a simple approach to deploy the build to S3, i.e., by syncing up the dist directory to the S3 bucket with this command:
aws s3 sync dist/profile-angular/ s3://<<S3_STATIC_WEBSITE_BUCKET_NAME>>You are all set now!
By the way, you can also configure the command under the “scripts” section of “package.json”, like this:
"aws-deploy": "aws s3 sync dist/profile-angular/ s3://<<S3_STATIC_WEBSITE_BUCKET_NAME>>"And then you can run it simply like this:
nm run aws-deployAccess your S3 static website bucket and you are good to go.
Thank you for coming this far!